My photo
Phoenix, Arizona
I am an Independent Stampin' Up! Demonstrator. I love my job, family, friends and crafting. Join me in this adventure of crafting and blogging.

Sunday, January 9, 2011

You might be a redneck...

If you're wearing your undies as a faux tank!

You know those commercials on t.v. with the piece of fabric that covers a woman's...um, northern assets.

I have a couple of blouses that I have to wear something under because the neckline is waaay low, but I HATE to wear tanks or even camisole's underneath. I am not one of those peole that layer my clothing. Blech, I'm chunky and uncomfortable as is, I don't need any more "bulk". lol

So back in December, I went to wear one of my fave blouses. It's flow-y around the midsection & I was feeling particularly bloated...but the neckline looks like this:


WHOA Nelly, cover that stuff up! There are children around!

So I was trying to think of what I could wear underneath without having to do the layers. All of a sudden, it hit me...I have some undies that I never liked, and they have lace trim. I can use those!

Here they are. And yes, they are clean...dirty undies would be nasty and I can't believe you even thought that! lol

 All I did was cut up the sides and across the bottom at the seam.

Then all I had near me were big honkin' safety pins, so I used those to attach it to my bra and voila!


And here's the PG version of my blouse.


A redneck faux cami!

If you didn't have any un-comfy undies hanging around, I think the Dollar Store carries some?


Oh, and the funny thing is...I ended up not wearing the blouse that day. LOL
Typical me....

Sunday, December 19, 2010

Tuesday, November 9, 2010

Design help....

Hello Blog Land!

I recently painted a couple walls in my den/open kitchen area & one wall in particular is giving me decor troubles. I don't know what to put up there....I had a scroll-y thing before, but never cared for it.

The main problem (to me) is that the big screen tv is centered on that wall. I don't think anything square or rectangle will look good becuz of the tv shape....am I wrong?

Here's the wall in question (you can see how it is open to the kitchen on the right):

I don't think a mirror would be good because right across from it is this...
you can see the wall & tv in the mirror...lol


And to the right of that wall is this:


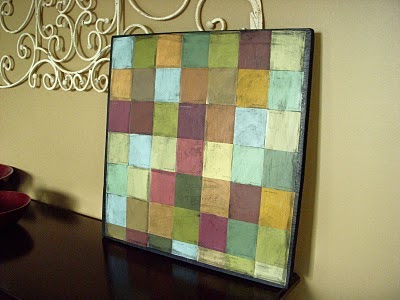
 Sooooo, what do YOU think? I'd love to create something like this to put up there:

(Edited to add: This project is from Jennifer at Hope Studios ... They are paint samples!)

But then again, it is square...decisions, decisions!

Thanks for ANY ideas you may toss my way!!

Marjori

Monday, November 8, 2010

Ok, ok, ok...

I know, I haven't posted in like forever, but I get lazy!  ;o)

So I thought I'd throw a few things out here for whomever is looking at my blog to see.

These are cards we made at my PMS Class for September...yes, September...deal with it. lol

All are either directly CASE'd (Copy And Share Everything), or CASE'd with my own twist. Sorry, I can't remember the original artists...if it was you, then please let me know so I can give proper credit!!!  :o)


I hope you like them! I know my girls & I did!

Inky Hugs!

Marjori

Saturday, October 30, 2010

Christmas Card Tip - Card and Envelope Sizes

Hello!

With Christmas getting closer, I know some of you are making Christmas Cards for your Family and Friends (I'm also making them for my boss), so I thought i'd share with you, the various sizes of cards and envelopes.

I hope this will be a quick reference to help your card planning run smoothly. Enjoy!


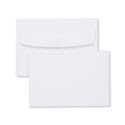
This first one is the size we usually make in classes:
Card Paper Size: 5 1/2" x 8 1/2"
Card Folded in Half: 4 1/4" x 5 1/2"
A2 Envelope Size: 4 3/8" x 5 3/4"


Card Paper Size: 8" x 12 1/4"
Card Folded in Half: 4 1/2" x 6 1/8"
A4 Envelope Size: 4 3/4" x 6 1/4"


Card Paper Size: 9 1/4" x 6 1/4"
Card Folded in Half: 4 5/8" x 6 1/4"
A6 Envelope Size: 4 3/4" x 6 1/2"


Card Paper Size: 7" x 10"
Card Folded in Half: 5"x 7"
A7 Envelope Size: 5 1/4" x 7 1/4"


Card Paper Size: 8 1/2" x 11"
Card Folded in Half: 5 1/2" x 8 1/2"
A9 Envelope Size: 5 5/8" x 8 5/8"


Card Paper Size: 3 3/4" x 7 1/2"
Card Folded in Half: 3 3/4" x 3 3/4"
Envelope Size: 4" x 4"


Card Paper Size: 8" x 9 1/4"
Card Folder in Half: 4" x 9 1/4"
Envelope Size: 4 1/8" x 9 1/2"

Have a great day!

Wednesday, October 20, 2010

Make it a Stampin' Up Handmade Holiday!

Handmade Holiday photo


Here’s the ABCs of how to have the perfect Handmade Holiday!


AAmazing Cards!
No, you don't have to "be creative" to make beautiful handmade cards! I'll show you how! Come to one of my classes, to Christmas Card Stamp-a-Stack, or request a private class with friends!

BBeautiful Packaging!
Pretty packaging, made with love, equally rivals the most expensive store-bought packaging. Use Stampin' Up! products to create the perfect sentimental gift.

CCherished Gifts!
Make sets of cards, gift card portfolios, adorable boxes, home decorations and more with a few simple supplies.

Want to know the best part?
You CAN create the perfect Handmade Holiday now at 20% off! From October 19 – December 16, choose from several different holiday bundles - perfect for creating cards, gift packaging, and gifts – all at 20% off! Check out these GREAT deals!!

Stamp_Set_Bundles_US[1]-1

Contact me today to get started making your own Handmade Holiday!! Call me if you have questions, or order online for delivery straight to your home!

Wednesday, September 29, 2010

OMGosh....

Am I actually posting something??

I told myself I would try my best to post something at the very least, once a week...well, here it is months later, ugh. Sorry.

Here's a little lantern that I made yesterday (of course while I should have been doing something else).


I bought these little plastic skulls at the Dollar Tree a couple weeks ago & the lantern is something I bought maybe last year at the Tarjay dollar spot. I had other plans for it, but this popped into my head & I had to get it out. ;o)

Here's a semi-tutorial on how I made it. I think he is wicked cute! 

He's pretty freaky looking up close! ACK!

 I took my X-acto knife & cut a hole under him...

Next I took a battery operated candle also found at the Dollar Tree (2/$1)
and wrapped it with some scrapbook paper.

 Here's where my picture taking got real spotty...I was going to glue black glitter to the top
of the candle, but changed my mind & did something different.

 I took some black cardstock, punched it out with my scallop circle punch,
folded it in half, then punched a 3/8" circle in the center of that.
Then I punched a circle from sticky tape, adhered it to the scallop & adhered black glitter to it.
I then folded the scallops down & put them under the scrapbook paper circle I previously made.

Right about now, you're thinking "blah, blah, blah"....

Sounds like a lot of steps, but I thought I could re-use the stupid candle when I was done
with Halloween...who am I kidding?? Oh, the reason the "flame" looks funny is I thought if I colored it with a red Sharpie, it would give off a red glow, but it didn't...it just glowed brighter orange. lol

I then took the skull and placed it on top of the "flame"

 This is the lantern after I sprayed it flat black. It started out life a shiny red.

 And here's my cute little lighted skull lantern for very little over one dollar!
I was so excited, I forgot to put the handle back on...lol

I can't believe I have been decorating for Halloween already! The weird thing is, I am the type that puts the minimal decorations out like two days before the actual holiday, and only because my 12 yr old is begging me to! LOL

I hope you like my little creation! Have a Stamptacular Inky Day!

Marjori

 
Bookmark and Share