
This is pretty funny...
Have a safe & Happy Christmas!
Sunday, December 19, 2010
Tuesday, November 9, 2010
Design help....
Hello Blog Land!
I recently painted a couple walls in my den/open kitchen area & one wall in particular is giving me decor troubles. I don't know what to put up there....I had a scroll-y thing before, but never cared for it.
The main problem (to me) is that the big screen tv is centered on that wall. I don't think anything square or rectangle will look good becuz of the tv shape....am I wrong?
Here's the wall in question (you can see how it is open to the kitchen on the right):


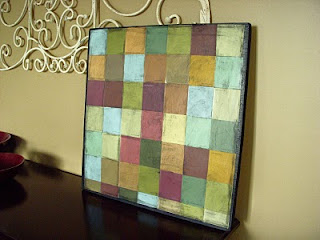
Sooooo, what do YOU think? I'd love to create something like this to put up there:
But then again, it is square...decisions, decisions!
Thanks for ANY ideas you may toss my way!!
Marjori
I recently painted a couple walls in my den/open kitchen area & one wall in particular is giving me decor troubles. I don't know what to put up there....I had a scroll-y thing before, but never cared for it.
The main problem (to me) is that the big screen tv is centered on that wall. I don't think anything square or rectangle will look good becuz of the tv shape....am I wrong?
Here's the wall in question (you can see how it is open to the kitchen on the right):

I don't think a mirror would be good because right across from it is this...
you can see the wall & tv in the mirror...lol

And to the right of that wall is this:


(Edited to add: This project is from Jennifer at Hope Studios ... They are paint samples!)
Thanks for ANY ideas you may toss my way!!
Marjori
Monday, November 8, 2010
Ok, ok, ok...
I know, I haven't posted in like forever, but I get lazy! ;o)
So I thought I'd throw a few things out here for whomever is looking at my blog to see.
These are cards we made at my PMS Class for September...yes, September...deal with it. lol
All are either directly CASE'd (Copy And Share Everything), or CASE'd with my own twist. Sorry, I can't remember the original artists...if it was you, then please let me know so I can give proper credit!!! :o)


I hope you like them! I know my girls & I did!
Inky Hugs!
Marjori
Saturday, October 30, 2010
Christmas Card Tip - Card and Envelope Sizes
Hello!
With Christmas getting closer, I know some of you are making Christmas Cards for your Family and Friends (I'm also making them for my boss), so I thought i'd share with you, the various sizes of cards and envelopes.
I hope this will be a quick reference to help your card planning run smoothly. Enjoy!
This first one is the size we usually make in classes:
Card Paper Size: 5 1/2" x 8 1/2"
Card Folded in Half: 4 1/4" x 5 1/2"
A2 Envelope Size: 4 3/8" x 5 3/4"
Card Paper Size: 8" x 12 1/4"
Card Folded in Half: 4 1/2" x 6 1/8"
A4 Envelope Size: 4 3/4" x 6 1/4"
Card Paper Size: 9 1/4" x 6 1/4"
Card Folded in Half: 4 5/8" x 6 1/4"
A6 Envelope Size: 4 3/4" x 6 1/2"
Card Paper Size: 7" x 10"
Card Folded in Half: 5"x 7"
A7 Envelope Size: 5 1/4" x 7 1/4"
Card Paper Size: 8 1/2" x 11"
Card Folded in Half: 5 1/2" x 8 1/2"
A9 Envelope Size: 5 5/8" x 8 5/8"
Card Paper Size: 3 3/4" x 7 1/2"
Card Folded in Half: 3 3/4" x 3 3/4"
Envelope Size: 4" x 4"
Card Paper Size: 8" x 9 1/4"
Card Folder in Half: 4" x 9 1/4"
Envelope Size: 4 1/8" x 9 1/2"
Have a great day!
Wednesday, October 20, 2010
Make it a Stampin' Up Handmade Holiday!

Here’s the ABCs of how to have the perfect Handmade Holiday!
A – Amazing Cards!
No, you don't have to "be creative" to make beautiful handmade cards! I'll show you how! Come to one of my classes, to Christmas Card Stamp-a-Stack, or request a private class with friends!
B – Beautiful Packaging!
Pretty packaging, made with love, equally rivals the most expensive store-bought packaging. Use Stampin' Up! products to create the perfect sentimental gift.
C – Cherished Gifts!
Make sets of cards, gift card portfolios, adorable boxes, home decorations and more with a few simple supplies.
Want to know the best part?
You CAN create the perfect Handmade Holiday now at 20% off! From October 19 – December 16, choose from several different holiday bundles - perfect for creating cards, gift packaging, and gifts – all at 20% off! Check out these GREAT deals!!
![Stamp_Set_Bundles_US[1]-1](http://lh4.ggpht.com/_hOjwU14ylsQ/TLzTYnYB_8I/AAAAAAAABrk/cx7Yo1L1z9E/s1600-h/Stamp_Set_Bundles_US%5B1%5D-1%5B5%5D.jpg "Stamp_Set_Bundles_US[1]-1")
Contact me today to get started making your own Handmade Holiday!! Call me if you have questions, or order online for delivery straight to your home!
Wednesday, September 29, 2010
OMGosh....
Am I actually posting something??
I told myself I would try my best to post something at the very least, once a week...well, here it is months later, ugh. Sorry.
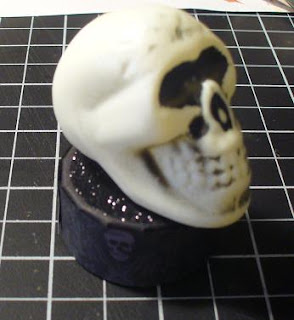
Here's a little lantern that I made yesterday (of course while I should have been doing something else).

I bought these little plastic skulls at the Dollar Tree a couple weeks ago & the lantern is something I bought maybe last year at the Tarjay dollar spot. I had other plans for it, but this popped into my head & I had to get it out. ;o)
Here's a semi-tutorial on how I made it. I think he is wicked cute!


I can't believe I have been decorating for Halloween already! The weird thing is, I am the type that puts the minimal decorations out like two days before the actual holiday, and only because my 12 yr old is begging me to! LOL
I hope you like my little creation! Have a Stamptacular Inky Day!
Marjori
I told myself I would try my best to post something at the very least, once a week...well, here it is months later, ugh. Sorry.
Here's a little lantern that I made yesterday (of course while I should have been doing something else).
I bought these little plastic skulls at the Dollar Tree a couple weeks ago & the lantern is something I bought maybe last year at the Tarjay dollar spot. I had other plans for it, but this popped into my head & I had to get it out. ;o)
Here's a semi-tutorial on how I made it. I think he is wicked cute!
He's pretty freaky looking up close! ACK!

I took my X-acto knife & cut a hole under him...

Next I took a battery operated candle also found at the Dollar Tree (2/$1)
and wrapped it with some scrapbook paper.

Here's where my picture taking got real spotty...I was going to glue black glitter to the top
of the candle, but changed my mind & did something different.

I took some black cardstock, punched it out with my scallop circle punch,
folded it in half, then punched a 3/8" circle in the center of that.
Then I punched a circle from sticky tape, adhered it to the scallop & adhered black glitter to it.
I then folded the scallops down & put them under the scrapbook paper circle I previously made.
Right about now, you're thinking "blah, blah, blah"....
Sounds like a lot of steps, but I thought I could re-use the stupid candle when I was done
with Halloween...who am I kidding?? Oh, the reason the "flame" looks funny is I thought if I colored it with a red Sharpie, it would give off a red glow, but it didn't...it just glowed brighter orange. lol

I then took the skull and placed it on top of the "flame"

This is the lantern after I sprayed it flat black. It started out life a shiny red.

And here's my cute little lighted skull lantern for very little over one dollar!
I was so excited, I forgot to put the handle back on...lol

I can't believe I have been decorating for Halloween already! The weird thing is, I am the type that puts the minimal decorations out like two days before the actual holiday, and only because my 12 yr old is begging me to! LOL
I hope you like my little creation! Have a Stamptacular Inky Day!
Marjori
Monday, August 9, 2010
Stamping 101 - Adhering Your Card Stock Layers
I just want to go over some adhesive options for all your paper crafting needs. Stampin' Up! offers many different types of adhesives for many different types of projects. Here is a quick description of each:
 Snail Adhesive
This Permanent Adhesive applies a controlled amount directly to your project, so your hands and work area never get sticky. Comes with 472” of adhesive and is refillable. Great for cards, scrapbooks, or other art projects.
Anywhere Glue Stick

This glue stick is a great economical choice for scrapbooking and card making. It's acid free, so it's safe to use on scrapbook pages. It’s also safe and easy for kids to use. The rectangular design makes those hard-to-reach areas reachable. Perfect for adhering card stock and Designer Series Paper to our chipboard. Odorless and permanent, 2 per package.
 Two Way Glue Pen
Two-Way Glue is versatile and provides a permanent or temporary bond. It's perfect for masking or working with stencils! The chisel tip makes it easy to get just the right amount of glue for adding glitter. Let the glue dry after you’ve applied it (it will become clear), and it will work just like a sticky note.
Dotto
Scrapbookers love this adhesive! You can reposition pictures and artwork without causing damage. The handy dispenser is so easy to use. You can also use Dotto to create a temporary mask. There is 49 feet of temporary, self-adhesive dots on paper backing. Convenient dispenser rolls dots from paper backing onto card stock, photograph, or accent Adhesive is solvent free and acid free. Refillable.
Mini Glue Dots
 Our Mini Glue Dots are super sticky, adhesive dots for use on 3-D accents (buttons, flowers, ribbon) for cards, scrapbook pages, and other projects. This fast, clean adhesive is safe for kids, too. No fumes, no mess, and no drying time required!
There is approximately 300 dots per roll; each dot approx 3/16" in diameter Adheres to paper, fabric, wood, foam, plastic, & more!
 Crystal Effects
Embellish any image without embossing using Crystal Effects. It gives a high-gloss finish to any image. 2oz bottle Creates amazing 3-D effects, and applicator tip gives great control. Water based for quick and easy cleanup. Dries completely within an hour depending on how thick it is applied.
Stampin Dimensionals
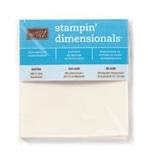
Stampin’ Dimensionals are the easiest way to give your projects an instant 3-D look. Just stamp an image, trim around it, and then use a Stampin’ Dimensional to attach it to your project. They are also great for making greetings stand out and attaching 3-D objects such as buttons, tags and bows. There are 300, 1/16" double-sided, self-adhesive foam mounts. Use multiple Stampin’ Dimensionals for multilevel projects or added height. Great for layering!
Sticky Pages
 If you like Sticky Strip, you’ll love Sticky Pages! Peel off the liner and sprinkle with beads or our chunky or fine glitters to personalize your projects, gifts, or work space. Two 12" x 12" blank sticky sheets per package. Use the sheets with your Big Shot machine to create custom shapes.
 Tombow Multi Purpose Adhesive
Sticky Strip
This Acid Free super-strong adhesive will hold together a box or pouch like a dream! It won’t lift, curl, distort, warp, or wrinkle. You can also use it to adhere other craft-related embellishments, such as beads, glitter, or embossing powder. ¼” wide, 10 yards Double-sided, pressure-sensitive acrylic adhesive. Comes in a zippered plastic bag for convenient storage.
 Heat & Stick Powder
Most people try to use glue to add glitter to a project, but it’s difficult to get a nice, even look especially on a detailed image. The Heat & Stick Powder fixes that problem perfectly. Now it’s so simple to get glitter to spread evenly across an image (you have to use with heat gun). Heats to a sticky surface to hold glitter. Use with Craft Stampin’ Pads or VersaMark ink, 1/2 oz.
As always, if you have ANY questions, please feel free to contact me!

This Permanent Adhesive applies a controlled amount directly to your project, so your hands and work area never get sticky. Comes with 472” of adhesive and is refillable. Great for cards, scrapbooks, or other art projects.
Anywhere Glue Stick

This glue stick is a great economical choice for scrapbooking and card making. It's acid free, so it's safe to use on scrapbook pages. It’s also safe and easy for kids to use. The rectangular design makes those hard-to-reach areas reachable. Perfect for adhering card stock and Designer Series Paper to our chipboard. Odorless and permanent, 2 per package.

Two-Way Glue is versatile and provides a permanent or temporary bond. It's perfect for masking or working with stencils! The chisel tip makes it easy to get just the right amount of glue for adding glitter. Let the glue dry after you’ve applied it (it will become clear), and it will work just like a sticky note.
Dotto

Scrapbookers love this adhesive! You can reposition pictures and artwork without causing damage. The handy dispenser is so easy to use. You can also use Dotto to create a temporary mask. There is 49 feet of temporary, self-adhesive dots on paper backing. Convenient dispenser rolls dots from paper backing onto card stock, photograph, or accent Adhesive is solvent free and acid free. Refillable.
Mini Glue Dots

There is approximately 300 dots per roll; each dot approx 3/16" in diameter Adheres to paper, fabric, wood, foam, plastic, & more!

Embellish any image without embossing using Crystal Effects. It gives a high-gloss finish to any image. 2oz bottle Creates amazing 3-D effects, and applicator tip gives great control. Water based for quick and easy cleanup. Dries completely within an hour depending on how thick it is applied.
Stampin Dimensionals

Stampin’ Dimensionals are the easiest way to give your projects an instant 3-D look. Just stamp an image, trim around it, and then use a Stampin’ Dimensional to attach it to your project. They are also great for making greetings stand out and attaching 3-D objects such as buttons, tags and bows. There are 300, 1/16" double-sided, self-adhesive foam mounts. Use multiple Stampin’ Dimensionals for multilevel projects or added height. Great for layering!
Sticky Pages


The Multi Purpose Adhesive has a dual tip for placing adhesive exactly where you want it. Place an exact small amount using the small tip, or spread the adhesive over a larger area using the wide tip. Latex rubber acrylic resin adhesive is acid free. Adhesive can be permanent or temporary depending on how it is applied. Easily adheres card stock & Designer Series Paper to chipboard.

Sticky Strip
This Acid Free super-strong adhesive will hold together a box or pouch like a dream! It won’t lift, curl, distort, warp, or wrinkle. You can also use it to adhere other craft-related embellishments, such as beads, glitter, or embossing powder. ¼” wide, 10 yards Double-sided, pressure-sensitive acrylic adhesive. Comes in a zippered plastic bag for convenient storage.

Most people try to use glue to add glitter to a project, but it’s difficult to get a nice, even look especially on a detailed image. The Heat & Stick Powder fixes that problem perfectly. Now it’s so simple to get glitter to spread evenly across an image (you have to use with heat gun). Heats to a sticky surface to hold glitter. Use with Craft Stampin’ Pads or VersaMark ink, 1/2 oz.
As always, if you have ANY questions, please feel free to contact me!
Monday, July 19, 2010
No Craft Today, just some awesome music!
I'm a HUGE fan of Phantom of the Opera, i've seen it 4 times and want to see it more!
I never knew Antonio Banderas could SING like this!! I had the goosebumps through the whole song!
And while we are on Phantom, how stinkin' cute is this little girl!
I hope to post some crafts this week. My 11 yr old is into Wizard 101 stuff and he wanted a wizard staff, so we made one!
Marjori Miller
Order Online 24/7
http://www.comestampwithmarjori.stampinup.net/
Thursday, July 15, 2010
Stamping 101 - Thinking Ink
There are many different types of inks for rubber stamping. These are available in a wide range of colors and pad sizes.
General inks for rubber stamping fall into three categories; dye, pigment or permanent-solvent based. In addition to these, inks have been developed that are technique specific, for instance inks for stamping onto fabric or for use with embossing powders.
Most inks are readily available in a wide range of colors from the deepest blacks to pale pastels. The main features of the inks are as follows:
Dye Based Inks
Pigment Based Inks
Inks available for specific techniques include:
Fabric Dyes – pads of inks suitable for stamping on fabric are available in a wide range of colors. These dyes are heat set and have other applications, for example they are great for use on shrink plastic and acetate.
Resist Dyes – these have been formulated to repel water based paints and dyes. Resist inks need to be set using heat and are suitable for a wide range of creative ideas.
A: There are several differences. Dye ink absorbs into the paper; pigment ink sits on top of the paper and does not absorb. Pigment ink tends to be thicker than dye ink and is often preferred for scrapbooking because pigment inks are more resistant to fading than most dye inks. (However, some dye inks are specifically formulated for use in scrapbooks.) The Stampin' Memories section of the Product Guide contains a more detailed explanation of this and other archival topics.
A: Pigment ink, by nature, dries more slowly than dye inks. You can heat-set the pigment inks to speed drying time or set them aside to dry. After heat-setting, pigment inks will resist all but the most deliberate efforts to smear them (such as wetting your finger and rubbing the ink). If you live in a humid area, you will want to heat-set the inks, because air-drying time increases as humidity increases. Heat-setting and air-drying produce the same color results. When heat-setting, be careful of heating too long, which may cause a scorched look.
Q: Can I use pigment ink for embossing?
A: Because of the longer drying time noted above, you have time to apply your embossing powder without rushing; therefore, the Craft pads are an excellent choice for embossing.
A: Pigment ink will not dry on slick surfaces, even when heat-set. However, if you seal the ink with clear embossing powder, you get a delightful glossy finish. Our recommendation is that this technique be used for decorative purposes only, because the image can be scratched off with your fingernail or metal, but it doesn't rub off with just a gentle rub from your fingertip. So you could use this technique for a decorative tile to hang on a wall, but you wouldn't want to decorate the tiles on your kitchen floor this way.
Q: What about wood?
A: Pigment ink works well on smooth raw wood and on wood already painted with a water-based paint, as long as it is heat-set. After heat-setting, you may choose to spray it with a fixative to add an extra layer of protection.
Q: Can I stamp walls with pigment ink?
A: Results with pigment ink on walls vary depending on texture, finish, and previous paint on the walls. Test on a small portion of unseen wall. If the image is dry after heat-setting, it may be used on the remainder of the wall. Acrylic paints are the best choice for stamping on walls.
Q: Does pigment ink work on fabric?
A: Yes, you can use it for stamping on fabrics. However, colors are less vibrant on fabric than on paper. Also, even after heat-setting, fabric inks fade slightly. This is true not only of our Craft pads but other fabric pads available in the retail market as well. For a more vibrant image, try stamping the same image twice (one on top of the other) using the Stamp-a-ma-jig®. Here are some important tips to remember when stamping on fabric:
A: As its name suggests, VersaMark is a very versatile ink! The following is a list of some of our favorite uses of this unique ink pad.
Tips for Inking Up Your Rubber Stamp and Stamping Your Image:
When inking up your stamp, please do not grind and twist or rock your stamp into the pad!!!
All it takes is a firm tap, tap, tap flatly on the ink pad. Look at the rubber stamp surface to be sure it's completely covered with ink and tap, tap, tap again if necessary.
Why? Grinding and twisting and pushing too hard into the ink pad can damage the ink pad, tear the foam on the stamp, and gets ink all over the wood block! Plus you might end up with ink on the recessed outer edges of the stamp that might show when you stamp your image. Gentle but firm is best, no need to get crazy!
To stamp the image, press straight down and hold for a few seconds to ensure good ink transfer. Do not rock or tilt the stamp back and forth...just press down and hold still. Re-ink the stamp with each new impression for a vivid image.
I hope this week's Stampin' 101 lesson helped answer any questions you may have had.
- Color fast and quick drying
- Good inks for a beginner to use as being fast drying, they are less likely to smudge
- Work particularly well with white and light colored papers and boards
- Will fade in bright lights
- Typically sold with a felt pad
Tip: Store dye based inks upside down so the dye flows to the top of the felt pad.
- Thick, rich slow drying inks
- Color and light fast
- Good for using with embossing powders
- Typically sold with a sponge pad
Tip: For faster drying, use your heat gun.
Permanent Solvent Inks
- Long lasting and permanent
- Fast drying with good colors
- Resilient dye that is suitable for over painting with water colors
- Can be used on a wide variety of surfaces including glass and wood
- Solvent based inks need to be used in a well ventilated room
- May need a special stamp cleaner
Technique Specific Inks
Embossing Ink – these special inks are clear or translucent and are slow drying. These have been designed specifically for embossing.
Q: What is the difference between pigment ink and dye ink?
Q: What about drying time and pigment ink?
Q: Can I use pigment ink on slick surfaces like tile, porcelain, and terra cotta?
- Prewash the fabric.
- Tightly woven and smooth-finished fabrics work best.
- Test a small area of fabric first.
- Heat-set immediately after stamping.
- Wash as normal or hand wash, but air or line dry.
- For best results, re-ink pad frequently.
Q: What are some of the many ways to use VersaMark® Ink?
- Two Step Stampin'
- Embossing
Use the VersaMark pad like you would any of our pigment ink pads in your embossing projects. Because VersaMark is a clear ink, you can use the embossing powder color of your choice without the color of the pigment pad showing through the embossed powder. If you just use clear embossing powder on your colored cardstock, the image will be tone on tone, just a shade darker (and shiny).
- Embossing with Classic pads
Ink and stamp with one of our Classic Stampin' Pads. Clean the stamp and then ink the same image with VersaMark, stamping directly over the image. Apply clear embossing powder and heat with embossing tool. Note: For best results, use the Stamp-a-ma-jig stamp positioner to help line up the image stamped with Classic pads and the embossed image.
- Embossing on Glass
- Poppin' Pastels
- Resist
- Emboss Resist
Stamp an image with VersaMark ink and emboss with Crystal Clear embossing powder. When the image is cool, sponge one or more colors of Classic ink over and around embossed image. The stamped image will resist the ink.
- Reverse Pastels
- Watermark
Tips for Inking Up Your Rubber Stamp and Stamping Your Image:
To stamp the image, press straight down and hold for a few seconds to ensure good ink transfer. Do not rock or tilt the stamp back and forth...just press down and hold still. Re-ink the stamp with each new impression for a vivid image.
I hope this week's Stampin' 101 lesson helped answer any questions you may have had.
Saturday, July 3, 2010
The New Catalog is HERE!
And it is gorgeous!!
Not to mention, packed full of NEW COLORS, stamp sets, embellishments and so much more!
Not to mention, packed full of NEW COLORS, stamp sets, embellishments and so much more!

To see the catalog click HERE.
To order from the catalog, click HERE, then click SHOP NOW.
Our new Definitely Decorative catalog now available also!

Click HERE to see all the gorgeous & fun vinyl Decor Elements. Check out the chalkboard vinyl! So darling! There are labels for jars, vinyl chalkboard for the walls in cute shapes, calenders, menus and more.
I so want to copy this idea with the mirror and the Medallion! Oooh, if I had the kind of house with a chandelier, this would look great on the ceiling where you mount the chandy! GOJUS!

With all the hoopla about the new Idea Book & Catalog going live, we can't forget that the Summer Mini is still active. There are some really cute sets in there, accessories too!
CLICK HERE to download.

If you have any questions, you're welcome to EMAIL ME!
Have a great 4th and stay safe!
Monday, June 14, 2010
Hello...ooo..oo..oo
Anyone still out there?
I haven't really been doing much in the form of crafting or stamping, but I wanted to share these font sites I just came across. I am a font geek freak, and when I find cool FREE fonts, that gets me wicked excited! :o)
First up is BLAMBOT FONTS - they have all these cool comic book type fonts! Some you have to pay for, but some really cool ones are free to use! I personally downloaded about 15 of them. ::grin:::
Second is SCRAP VILLAGE - I may have downloaded a few from here too....lol
FONT SQUIRREL has some cool commercial free fonts. I haven't gone through their site yet...but fully intend to!
And last but not least, the site that I think I downloaded everything from....FONTS FOR PEAS - they have the best handwriting fonts & dingbats for scrapbooking that I have seen!
So go get yourself some FREE fonts and I hope to be back soon with something to show you!
Tuesday, June 1, 2010
Save 25-50% on Last Chance Products
The list of retiring sets is posted today, and there are several sets that I will personally miss!!
Now on to the awesome news...from now until June 30, you can save 25-50% on select "Last-Chance" products!
Please note that the Last Chance Accessories are only available while supplies last, so make sure to order early for the best selection. Also, you'll note that the list is quite long this year. Some items are being reconfigured and will appear in the new catalog in a slightly different form, so make sure to watch for that designation when you view the list.

Only available while supplies last until June 30, 2010


Select Items on SALE -- 25% - 50% Off
Monday, April 26, 2010
I want to be an artist...
I just came aclross this awesome artist Alisa Burke. She has this video that makes me envious of her talent!
its all about the journey from Alisa Burke on Vimeo.
its all about the journey from Alisa Burke on Vimeo.
Tuesday, April 13, 2010
From Ugly to Uglier?
Forewarning, this is a looong post.....
As you can see, these started out as ugly little "canvases" from the dollar store. VERY ugly if you ask me...and if not, oh well! ;o) Just as a precaution, I sprayed them with Kilz before I started working on them. Just in case thefugly-arse picture would show through.

I painted them with acrylics; Cadium Red & Alizarian Crimson. I just kinda swiped the color everywhere & let them dry. Unfortunately, these "canvases" weren't very tight, so you see the sagging (which made for a big pain in my arse later on), but what did I expect for a buck, huh??


The next day, I went to Michael's to purchase some Texture Magic; basically spackle in a tube with color...did I use a coupon? OF COURSE! 50% off baby!! Ended up something like $3.00.
I already had this stencil that I sell through my Stampin' Up! business. I didn't think I would ever use it, but I have used the heck out of it & it still looks like new! If you'll notice, I started out with all 4 "canvases" together & placed the stencil in the center.


As you can see, these started out as ugly little "canvases" from the dollar store. VERY ugly if you ask me...and if not, oh well! ;o) Just as a precaution, I sprayed them with Kilz before I started working on them. Just in case the

I painted them with acrylics; Cadium Red & Alizarian Crimson. I just kinda swiped the color everywhere & let them dry. Unfortunately, these "canvases" weren't very tight, so you see the sagging (which made for a big pain in my arse later on), but what did I expect for a buck, huh??

Next, I took some old wood stain I had lying around & painted it on. Then I took plastic wrap & layed it over the wet stain, making sure there were plenty of wrinkles.

I let it sit for a minute so I could take a potty break, then came back & pulled off the plastic. Perfect!

I let those sit overnight to "cure"...really, I was just tired of standing out in the garage while I could be watching General Hospital cleaning the house! :::yawn:::

The next day, I went to Michael's to purchase some Texture Magic; basically spackle in a tube with color...did I use a coupon? OF COURSE! 50% off baby!! Ended up something like $3.00.
I already had this stencil that I sell through my Stampin' Up! business. I didn't think I would ever use it, but I have used the heck out of it & it still looks like new! If you'll notice, I started out with all 4 "canvases" together & placed the stencil in the center.

I had to let that dry overnight so I could start filling up the blank spaces. When that was done, I got sidetracked on another project & didn't return to this until a week later...I know I am the only one who does that, right? ;o)

When I came back to it, it was looking a little too much like mustard swirled on there, so I took an old paintbrush & my stain, then drew over the swirls really sloppy like. I quickly wiped off the stain with an old t-shirt...at least I hope it was an old one and if not, hubster will never know, right? RIGHT??
Here's how they turned out...I want to mount them a little closer & frame them with a nice, chunky frame in the same stain. Maybe that will make them look a leetle better? lol

Here's where the big pain in the arse comes in...see how the "canvas" is concave...when I spread the texture on, it seeped under the stencil & got all mucky, so I tried to scrape off what I could, but that stuff starts drying pretty quickly. Maybe I can redo another one, but we all know it won't match if I do. lol

SO sorry about the crapola lighting, it was dark out & I wanted to get this posted.
I hope you didn't laugh at me too much. ;o)
Thanks for visiting!
Marjori
I am linking to

Subscribe to:
Posts (Atom)


